In this article I show how I built a furnace - very similar to another design, just scaled down a bit. I designed a piece of jewelry, made a mold using the lost wax technique, cast the piece of jewelry then set a stone in it. All the materials are easily obtainable. It works with precious metals but if your on a budget and even cheap jewelry from Wal-mart can be melted down and used. It makes an attractive piece that carries a certain homemade charm (no pun intended) without the tacky homemade look. I made a necklace, but the technique can be applied to rings, bracelets, earrings, glasses, small machine parts... really the only limit is your imagination. (although for highly complex designs with many small or detailed surface features you may need to build a centrifuge which I built for the ring article)
Step 1 - Gather Materials
A list of required materials

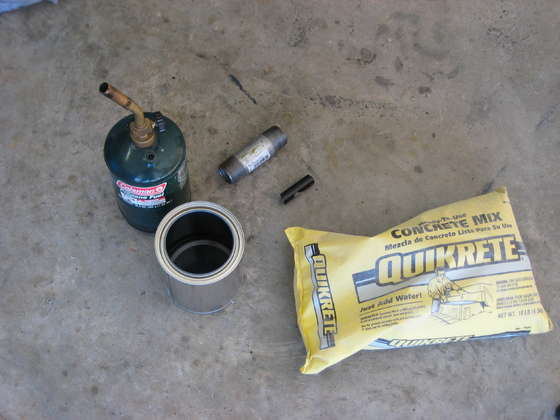
Furnace-1 Quart paint can
-10 LB bag Quickrete
-Butane torch
-1" x 7" pipe
-1/2" diameter steel pipe
-3/4" diameter copper pipe caps
-10 Ga. Steel wire
-Brick (without holes)
-Something to mix the concrete in
-Something to mix the concrete with
-Small piece of cardboard
-Masking tape
-Hand tools
-Dremel (optional)
Molds
-Faster Plaster
-Water
-Source of wax (unscented candles work well)
-Carving tools (exacto knives work well)
-Small wooden blocks
-Heat source (microwave works well)
Casting supplies
Any metal with a melting point under ~2000 Degrees F
Small fire to heat mold, camp stoves work great
Pliers
Finishing Tools & Supplies
-Polishing compound
-Dremel with: Polishing Wheel, Engraving Bits (optional), Diamond Cutting Wheel (to cut stone)
-Fine sandpaper (if casting is rough)
-Claps, rings, fasteners, chains etc... (available at most craft stores such as Michaels or Hobby Lobby)
-Marine grade epoxy (to set stone)
-A box to put finished jewelry in (optional)
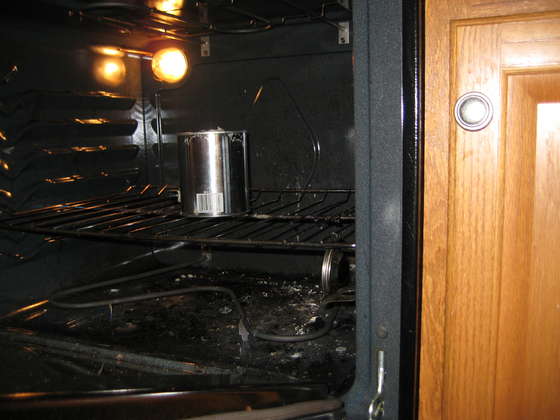
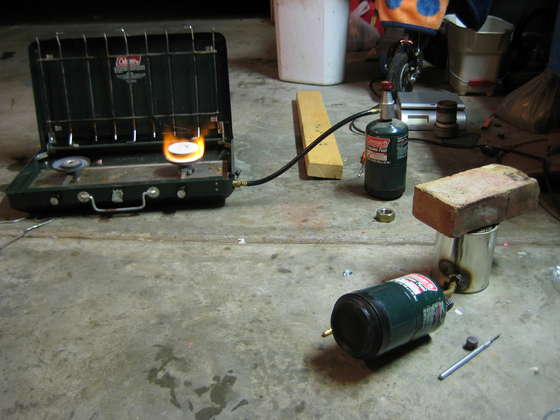
Step 2 - Build Furnace
Building the furnace is pretty straight forward. Mine is very closely related to this furnace, the only difference being that mine is smaller.
The theory behind the furnace is basically just to trap the heat from the blowtorch so that you can heat up a crucible really hot. We do this by filling a paint can with concrete but leaving a cylindrical hollowed out portion in the center. By placing your metal in a crucible sealing it in the furnace we can obtain temperatures much higher than by just heating the crucible with a blowtorch. The furnace also gives a nice even heat.
I'm not going to go into great detail on the construction of the furnace because the other guide does
a fantastic job of it, however I will give a brief overview of construction and a few things that are critical to success.
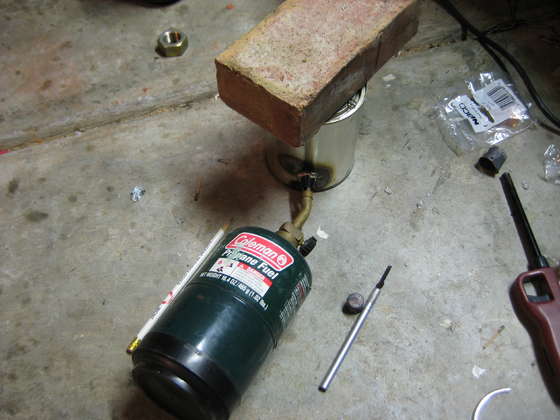
Cut 1/2" pipe down to length. This is the channel the blowtorch goes into. Its OK it its a little bit too long, just make sure that the air holes on the blowtorch aren't blocked, otherwise you will just get a very cold, useless yellow flame. one end should be cut with about a 30 degree angle so that it lies flush with the wall of the cylinder
Cut a hole in the can so that your 1/2" pipe will press fit into it. Its important that the pipe enters into the very edge of your hollowed out cylinder, thereby creating a heat spiral in the chamber, which helps prevent hot spots. (The other guide describes this much better than myself)

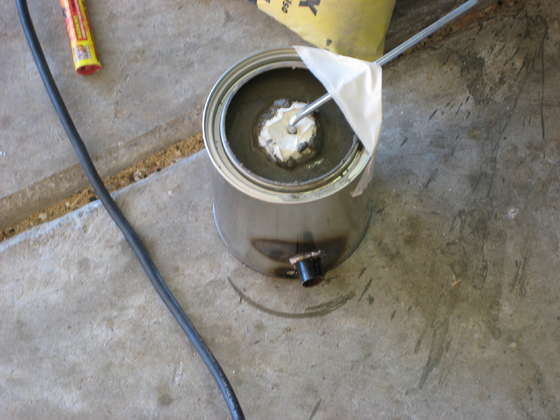
Somehow suspend your 1" pipe ~3/4" centered above the base of the paint can. I used a tent stake taped to the edge of the can. You can see that I wrapped my 1" diameter pipe in cardboard and covered the ends with masking tape, this was so that concrete wouldn't get into it, and to make it easier to remove once the concrete had cured.
important make sure that concrete cannot get into your small channel for the blowtorch and that after pouring the concrete that the pipe goes into the hollowed out chamfer (not blocked by concrete) the way i did this was to cut a circle in the cardboard surrounding my pipe which the smaller pipe fit into.
Let it cure for at least 2 hours then put it in the oven for an hour. I removed the cylinder after an hour then put it back in for 3 more.
important make sure that you don use rubber tapes to secure the inner cylinder because they will melt all over your oven and smoke and possibly catch fire. I used masking tape which browned slightly but never caught fire. I think this was because of the prodigious amounts of moisture coming off the concrete so pay VERY close attention when you are baking it. If i were to do it again i would use wire to secure everything instead of tape. The masking tape and cardboard are pretty much safe because they are surrounded by concrete and unable to burn.
Immediately test fire it for 30 minutes after taking it out of the oven. Since the concrete is already hot this will help prevent stress fractures from the rapid heating of the blowtorch. This fully cures it and i used mine immediately after this step. Be warned that it could fracture any time shooting out tiny thousand degree particles of concrete so eye protection is REQUIRED.
Build the crucible. My crucible was pretty simple, i just drilled two 1/16" holes on opposite sides of the 3/4" copper pipe caps and bent the wire into a sort of hook shape which went into those holes, this allows the crucible to rotate when you do your 'pour'. I put a 90 degree bend in the wire crucible holder so that the brick could sit atop it.
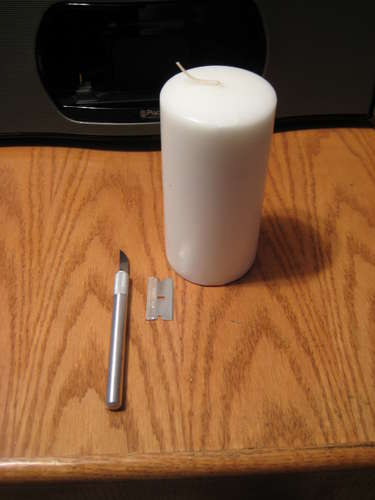
Step 3 - Make Molds
The molds are created using a process called lost wax casting. Basically you carve whatever it is you want to be made out of wax. You set it in plaster then melt the wax out leaving a cavity in the shape of whatever you carved. You pour molten metal into this cavity and let it cool, creating a beautiful piece of jewelry. Its a little bit easier said than done but with a little practice becomes relatively easy.
I bought a big candle at Wal-Mart and melted it down with my blowtorch into a plastic cup. The candle had a bit of a grainy quality to it that was gone after melting it. Which allowed me to get much more detail when carving and it prevented the wax from 'crumbling'. You can melt the wax into anything that wont melt and you don't mind getting waxy.
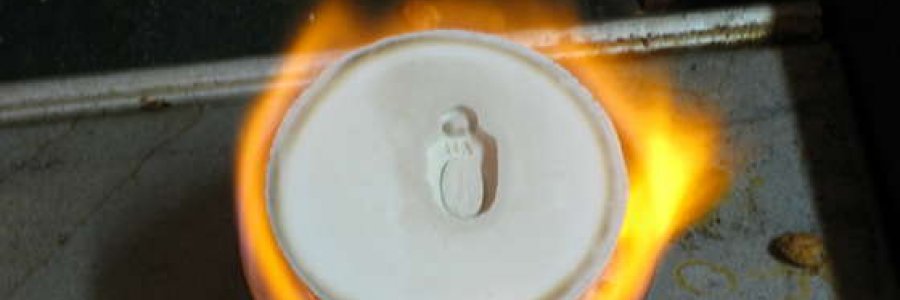
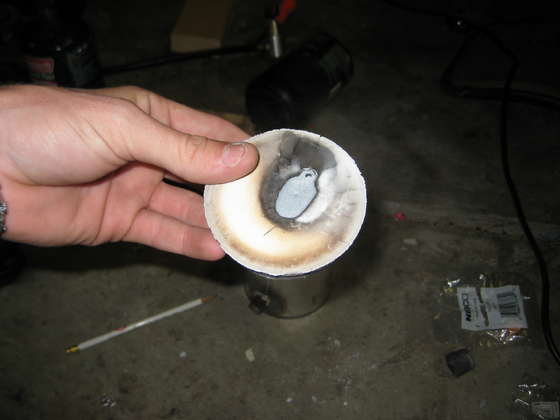
Carve. There is no real set way to do this. I traced an outline of the piece onto the wax and just free handed it with an exacto knife. The picture of the finished mold is from an earlier design for my piece, after many tries the design evolved into what you see in the first picture.
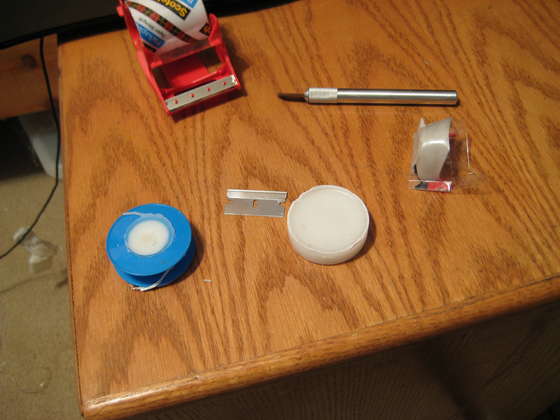

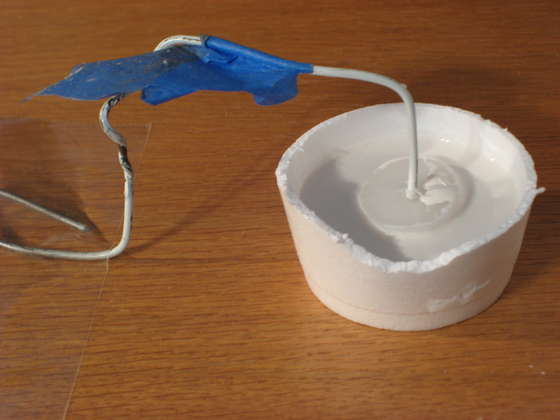
Set the wax in plaster. I used a special microwavable version of plaster called faster plaster that after an hour of curing can be microwaved for a few minutes fully curing it. This isn't necessary but it prevents having to wait 24 hours for the plaster to cure and if you invert the mold on a couple wooden blocks (i used jenga blocks) all the wax will cleanly melt out (preferably onto a paper towel) while its in the microwave. I suspended the wax piece by a hanger in the center of the plaster and used a cut off Styrofoam cup to hold the plaster. After an hour the plaster is hard enough to remove the hanger and peel off the cup.
Also make do your best to remove any air bubbles from the plaster. Tapping it gently on a table helps remove some, i mixed my plaster using a Gillete vibrating razor modified so that it didn't have any blades (basically just a vibrating handle) it worked very well.
important you cannot leave the Styrofoam cup on the plaster while microwaving because it prevents the water vapor from escaping from the plaster.
Note: though I used candle wax for this piece, in the ring making article I used casting wax which is much easier to carve, holds its shape better, allows more detail, is less brittle, and burns out more easily. I could only find it online but it costs about the same as a candle so there is no reason not to use it
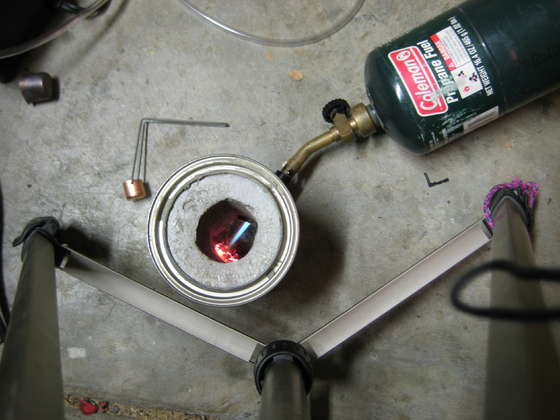
Step 4 - Casting
Setup - you want your mold hot and ready to accept the metal, it needs to be hot so it doesn't fracture when receiving the ultra hot metal. It also keeps the metal hot longer thereby flowing better which in turn gives your piece more detail. I used a camp stove which produced a ring of fire almost perfectly the diameter of the mold. You could build a fire if you were outside or possibly heat it up with another blowtorch if you had one (you cant use the one for your furnace)

Let the furnace heat up for a few minutes, make sure you have the brick on top to keep the heat from escaping. You want the crucible in the furnace.
Put your metal in the crucible and lower it into the furnace. Replace the brick.
After waiting a few minutes take the brick off and check the metal, if its red hot and molten then its OK to pour.
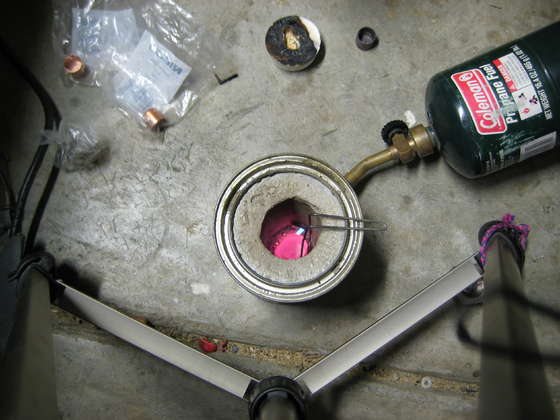
Quickly but carefully pull it out using pliers on the edge of the wire crucible holder. Bring it over to the mold and pour.
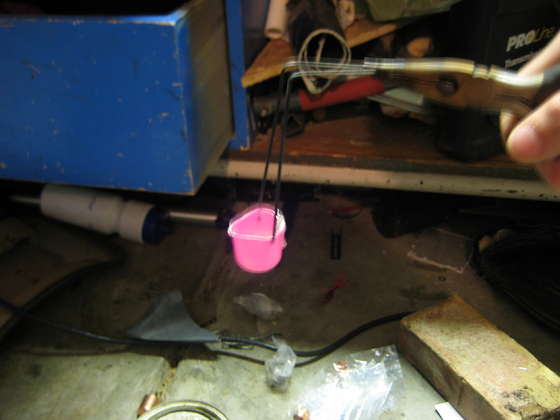
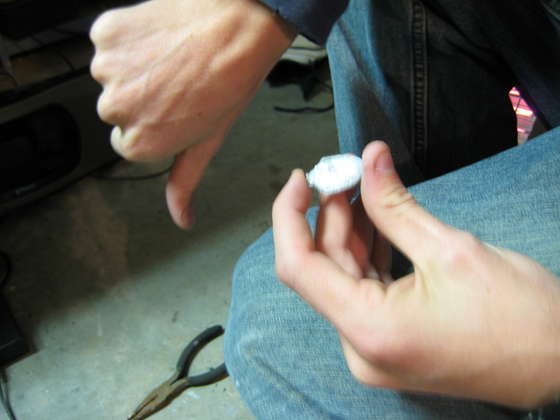
Slowly remove heat from the mold and let it cool for at least an hour before touching.
You could possibly pop the metal casting out of the mold but i found it easier just to break the mold.

Inspect your piece, if it didn't work the way you wanted try to figure out why not (was there air bubbles etc...) and try again. I had to do at least 10 castings before I got the results I wanted. (although i didn't have a sweet guide like this to follow)
Step 5 - Finishing
The piece came out with a bit of a rough texture which i had to polish off. The back was also entirely too thick so I ground it off using a sanding wheel on my dremel.
These steps vary greatly depending on what it is you cast but what i did was
Grind down the back of the piece so it was flat
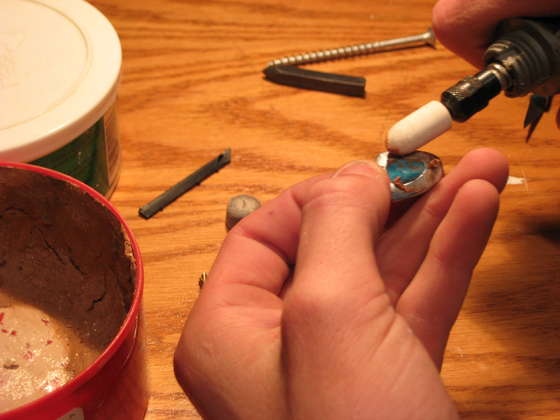
Polish the front to a nice shine. I used automotive polishing compound and a polishing wheel on my dremel.
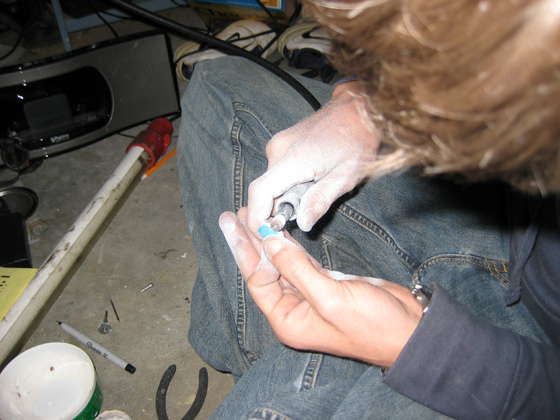
I used an engraving bit to engrave the initials of the recipient into the top and a diamond tipped cutting bit to make the recess for the stone.
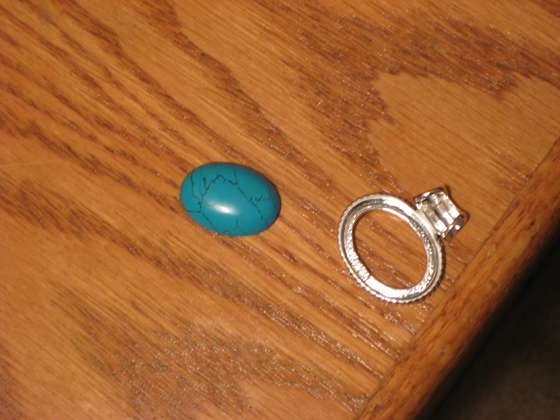
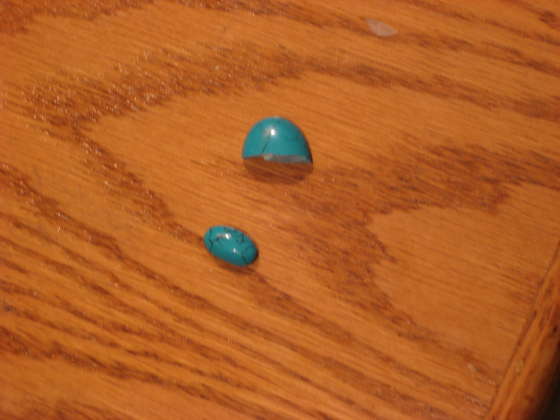
I cut a large turquoise stone (which i had obtained from another piece of jewelry) down to size then polished that using automotive polishing compound as well. Lots of tiny adjustments to the stone later it was a perfect fit.
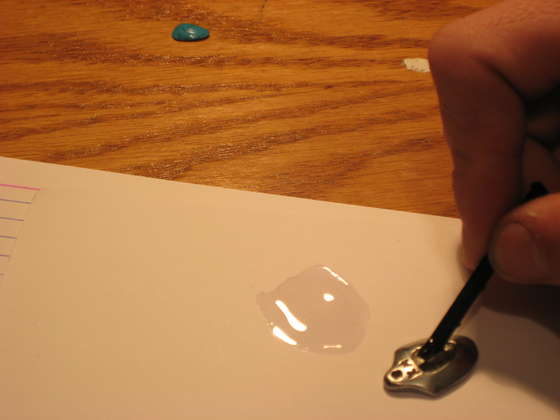
Step 6 - Mount Stone and Add Chain
I mounted the stone using a clear drying marine grade epoxy. Its relatively straight forward. Its a two part epoxy so I mixed it. Applied it to the recess in my piece then put the stone in. I let it cure overnight then gave the piece a final polish so the edge of the stone was perfectly flush with the metal.
To mount the chain I bought a pack of sterling silver rings from Michaels for just a couple bucks. Just put the ring through the hole in the piece then solder using silver solder from radio shack (I know its really low silver content but it doesn't contain lead which is important.

Closing Remarks
This a great way to make a very special gift. But it really can be used to make anything small and metal, the only limit is your imagination.
Depending on the metal that is being used the amount of detail obtainable varies. For example I was unable to obtain very sharp, clean edges, they always came out with a slight fillet. At a certain point you may need a centrifuge to force the metal where you need it to go. I built one for another project. You can check it out here
Warning Don't make jewelry out of lead. It is toxic. And tacky.