In this article I show how I cast a homemade ring using lost wax casting using an old bicycle turned into a centrifuge. A centrifuge allows much more intricate and detailed castings to be made, this instructable shows the creation of a ring, but almost anything small and metallic can be made using this process. A centrifuge spins a mold very quickly in a large arc forcing the molten metal into the mold. This is a very fun and rewarding project to undertake. Since I utilized an old bike it is fairly easy to construct the centrifuge, with only minor modifications to the bike being necessary.
I used the same furnace I detail in my casting part one article to melt the metal, as well as essentially the same mold making procedure. Though I will cover the mold making in detail again as there are some important differences.
DISCLAIMER
When operating a centrifuge such as this there is a huge chance of slinging molten metal. Molten metal + eyes = blind. Wear safety goggles, and a good pair of gloves. Also don't try to cast with a cracked mold. The forces put upon the mold are huge and if its cracked, it will break and then it will hit the tail of the bike and shatter into many flaming hot pieces. This happened to me, admittedly it was very cool, its still not something you want to happen.
Why Take the Time to Build a Centrifuge if I Can Just Pour the Metal Into My Molds? There is one main reason:
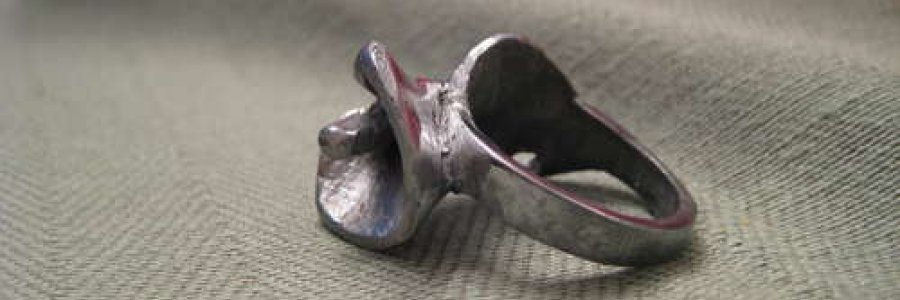
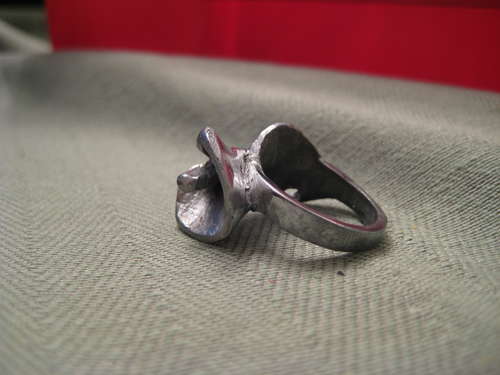
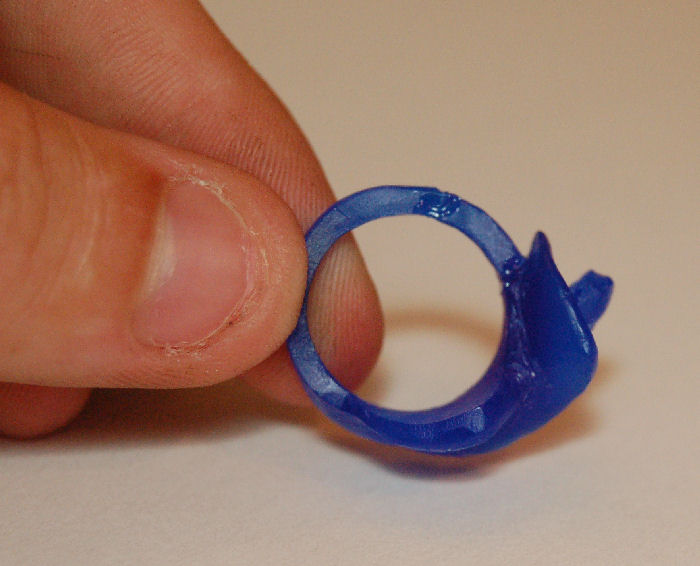
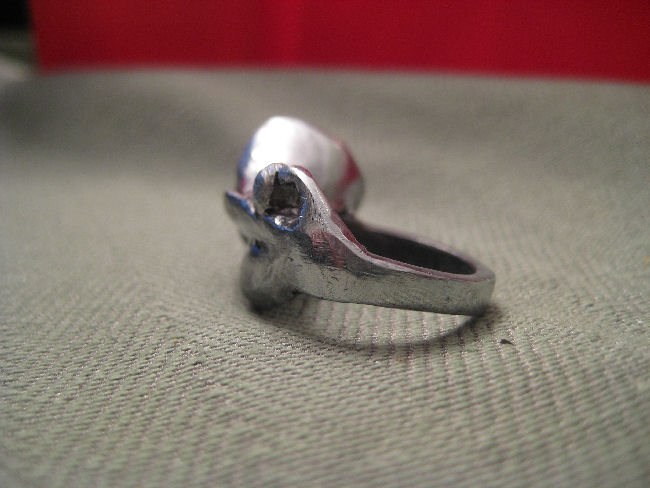
You can get an unbelievably detailed/intricate casting, in fact you can cast just about anything with a centrifuge. With normal casting you have to worry about whether the metal will flow, will you get the detail, will the metal cool before it fills the mold etc. Those aren't really problems with centrifuge. For comparison look at the two castings below. The first one, the necklace was made by conventional pour casting. It is a nice necklace, but it is rather plain. The initials I had to engrave with my dremel and I had to drill the hole for the chain ring because I couldn't get them by casting. The second is a ring I made by centrifuge casting. When it came out of the mold every detail was on it right down to tiny scratches I had made on the wax with my carving tools. The ring looks like it has a terrible finish, but the tiny scratches you see polished out, and could have been prevented had I better prepared the wax pattern. The finish on the wax pattern dictates the finish on the cast part. (Though polishing will always be necessary due to oxidation and other things that prevent a perfect finish)
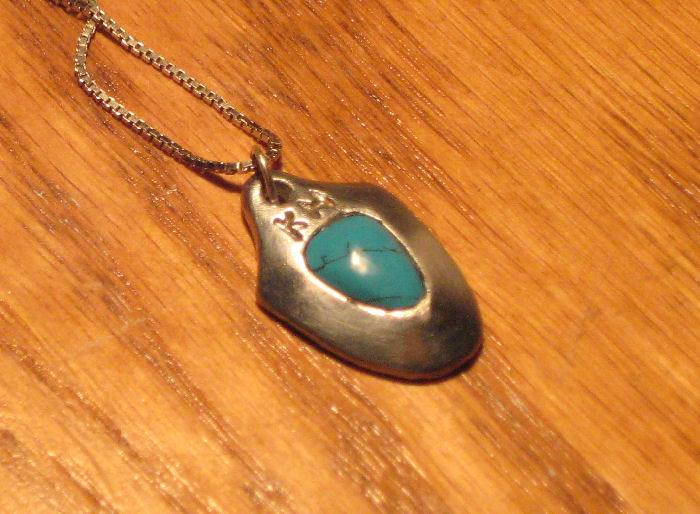

Had I made the necklace with a centrifuge I wouldn't have needed to engrave the initials or drill the chain ring hole. This would have given me the flexibility to make a non round hole or make better initials by carving.
Required Materials
Mold:
-Wax Ring Tube. I used ring wax purchased from http://www.alpha-supply.com/file-a-wax-ring-tube-c-bl.html it was the cheapest prices I've ever seen and they ship really fast. Its basically a long tube with a hole down the center in the rough shape of a ring. You cut off however much you need and carve the ring out of it.
-Votive Candles. These are extremely cheap "T-Candles" I use them for constructing the sprue of the mold and things such as the chamber that initially hold the molten metal.
-Plaster of Paris. This is what the mold is made out of. Though any kind will work I recommend "Faster Plaster." It is a fast setting microwavable plaster. It has a finer grain than other plasters and is extremely convenient because you can microwave it after an hour of setting. It greatly speeds up the ring making process.
-Something to carve the wax with. I use an exacto knife with a #11 blade and a set 12 wax carving tools off ebay ($5 and well worth it)
-Heat source to melt and bond together the various wax components (i use a lit candle)
-A mold for the plaster
-Tape
-Wax paper
-A kiln/oven/grill to burn wax out of mold
Centrifuge:
-An old bike, the bigger the wheels the better. I recommend a mountain bike over a road bike because there is much more clearance for the mold. (Road bikes have very skinny wheels which would make it difficult to nest a mold within their spokes)
-Hacksaw to cut off one of the pedals
-A wrench to dismantle various components of the bike
-Something small ~2lbs for a counter weight
-A board you can put between you and the bike to protect your legs from flying metal (2' by 2' plywood will do)
-Sheet metal to construct the mold holder on the bike wheel
-A blowtorch to melt the metal/Furnace depending on the metal used (for furnace information see This Article)
-Metal for jewelry piece
Carve Your Wax Pattern
The process for doing this varies greatly depending on the design of the ring and is a whole article unto its self. There is a great instructable about carving a platinum engagement ring that gives a great overview of the process.
http://www.instructables.com/id/Making-a-custom-Platinum-Diamond-engagement-ring./
The first and most important step is planning. You hate doing it, I hate doing it, everyone hates planning when their super excited to start a project. But there is no way around it. Plan your ring design. Sketch it out from different angles. Sketch drawings to scale so you can get an idea of the actual size of the piece. Figure out the ring size of the finger the ring will go on. Make sure every detail of the design is thought out. Once you start carving knowing what you are carving greatly expedites process, but it will save endless headaches and half starts. Its far too difficult to add wax back on once you take it off.
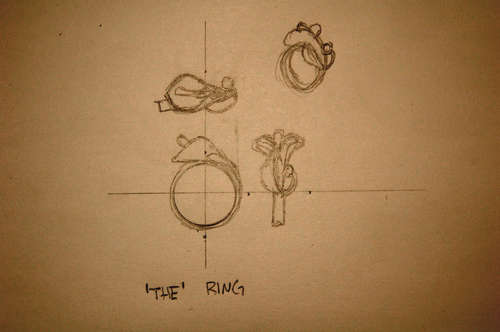
I knew that I wanted to make a ring that somehow incorporated a calla lily. So i looked around at various calla lily rings until I had an idea of what I wanted my ring to look like, then I started sketching. The end result of my sketch storming is in the image below. Since I had my final design drawn to scale I could finally start carving. Using a hacksaw I cut a piece of ring wax off the long tube a little bit wider than the width of the ring.
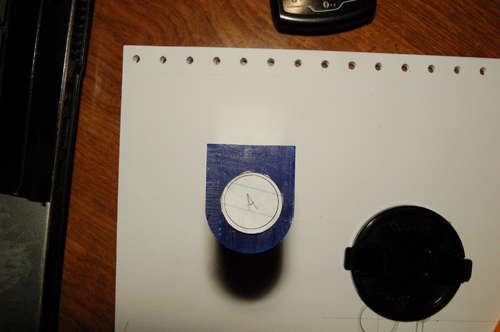
If you've never carved wax before I suggest you do a few 'practice rings' to get a feel for the tools. The best way to carve wax is to start with the rough shapes of the ring and refine the details of it a little bit of a time. I save carving out the band for last as it is very fragile and it is easy to accidentally break it off while your carving other features. A good way to get the design you sketched accurately transferred to the wax is to cut out profile views of different features of the ring, cut them out, then trace them onto the ring blank using an exacto knife. This can be seen in the pictures with the paper labeled "A" and "B." The letter signify different parts/views of the rings to help keep me organized.
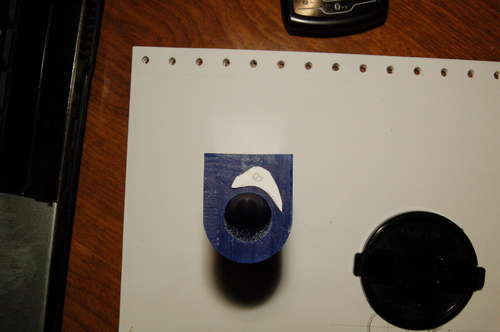
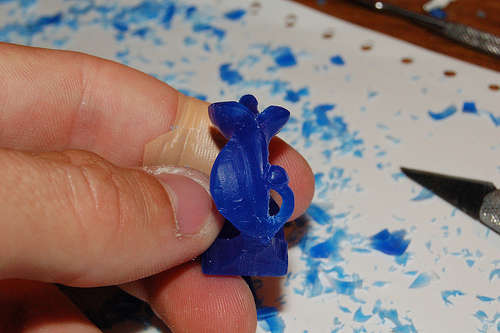
I started by cutting the side view to get everything into proportion then by eye carved all the other details one after another. The order of carving really doesn't matter. I saved any fragile details for last, such as the band, the little stamen in the flower, the little round "bead" detail opposite the leaf. Just carve until your happy with your design.
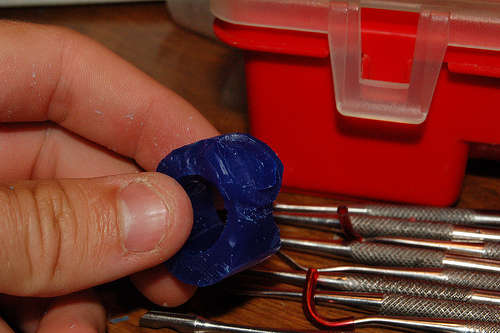
Give the ring a good once over checking that everything is just the way you want it. Make sure that there are no rough patches and that everything is smooth. The ring will cast exactly as the wax looks, so if there little nicks from the knife they will be in the final piece. Take time to smooth them out. It is much easier to perform surface finishing on wax than on metal. After you have your ring carved, your ready for the next step - adding the sprue!


Prepare The Ring for the Mold
In this step you add what is called a sprue to your newly carved ring (or whatever else you made). When you centrifuge cast you mold has two chambers, one that is open like a bowl (called the crucible) is where you initially put the molten metal. There is a small hole out of the side of the first crucible leading to the mold cavity made by the ring pattern. The hole connecting the two is made by what is called a sprue. When the piece is cast the metal flows from the crucible through that hole into the pattern. Since any hollows in the mold are made by carving them in wax, setting them in plaster, then burning them out we have to make what is called a sprue and attach it to our ring pattern.
Generally when centrifuge casting two piece molds are used, there is the mold that is clamped against a crucible (which is the cavity that accepts the molten metal) the reason for a two piece mold it it allows the crucible to be reused, cutting costs, mold sizes etc. Basically it allows higher volume production. Since I was making only one ring, and making a two part mold system would greatly complicate my design I have the pattern, sprue and crucible as one piece.
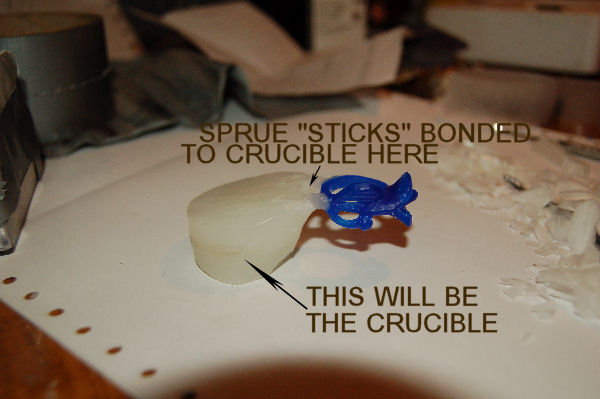
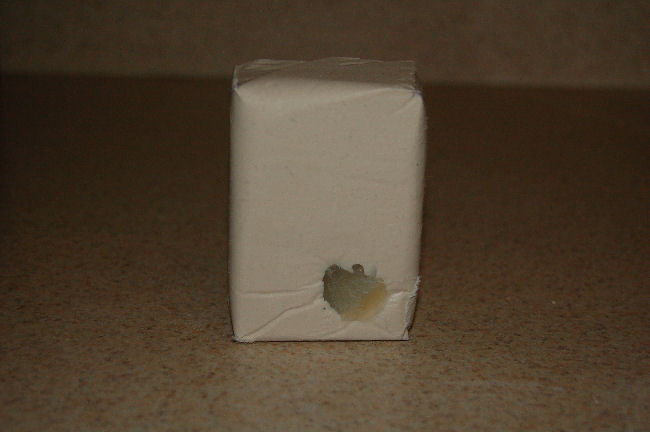
Using wax from votive candles first cut out two small "sticks" about 1/8" square and half an inch long. I used two because I wanted to ensure that there was a pathway for air to escape, but I've been told that one will work very well for a piece this small. I cut the ends angled so they mated well with the ring. Using a hot exacto knife heated up in a candle flame melt the ends of the sticks then stick them onto the ring while their ends are still molten. Reheating the blade melt the wax around the area where the wax stick attaches to the ring to make sure there is a good bond with no gaps. (See first image below)
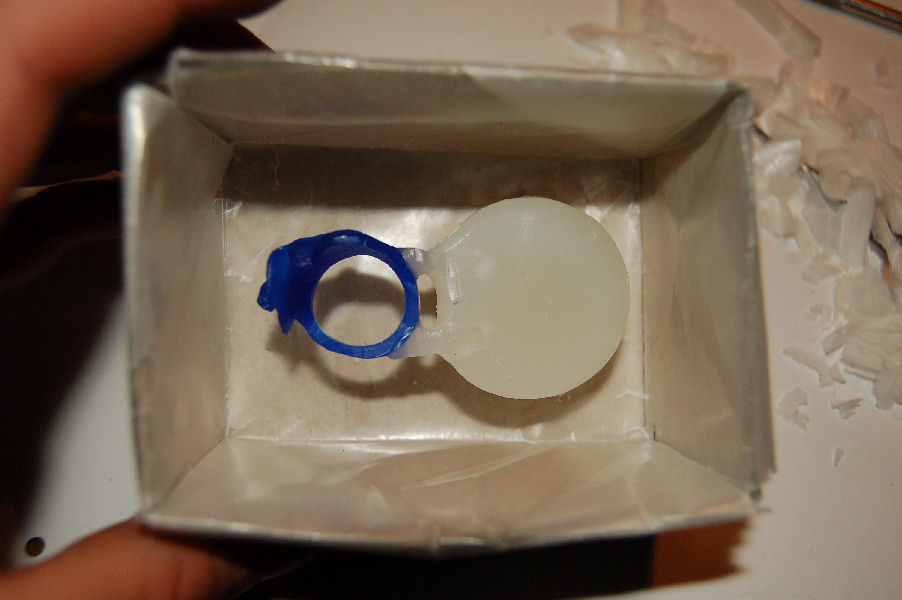
Next remove the wick from a new candle and cut two notches in the top corresponding to the sizes the two sticks now attached to the ring. Insert the two 'sticks' then using the hot exacto knife melt the wax around them so they are bonded to the candle. (See second image below) In the second image you can see that the bottom face of the crucible is flat and holds the ring parallel to the table. The flat face is necessary for attaching the crucible to the mold in the next step.

Make The Mold
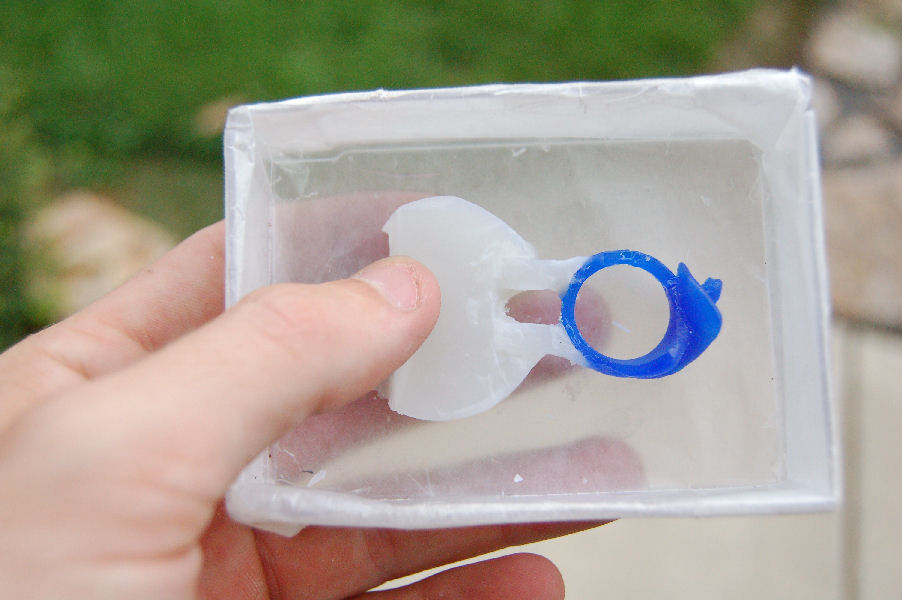
Now it is time to make the mold. I found a small rectangular plastic container that my mold/sprue/crucible assembly fit in comfortably to use as the plaster mold. I wanted the mold to be reusable and since the mold didn't have any draft it would be impossible to get the plaster out once it had cured without breaking the plastic container or the mold. To fix this problem I lined the mold with wax paper. The wax paper kept the plaster from sticking to the sides of the container and gave me something to pull on to get the plaster mold out. It was a bit tedious, and I have since made a mold with detachable sides to keep from having to do this step. As you can see in the image below I folded the paper so it fit well then taped it to the sides with duct tape. (in a few images you can see cardboard under the wax paper, I did this initially but realized it wasn't necessary and stopped using it).

The next thing to do was fix our ring assembly to the mold so that it wouldn't move around when the plaster was poured in. I attached the the ring mold to the bottom of the container with hot glue.
Now just mix your plaster up and pour it into the mold. I poured the plaster about 1/3" higher than the ring. I used a handheld massager on the side of the mold to get rid of any air bubbles. I had microwavable plaster so after an initial cure of an hour I could remove it from the mold (which is very important. Microwaving it in the mold will destroy your mold and could cause a small "explosion" as the pressure of the trapped water vapor was vented) and microwave it one minute 9 times at the lowest setting (usually the sprue and crucible mold made from the votive candles fall out in the microwave because of their low melting point). After that I took it to my grill and starting on low heat over about an hour I ramped the temperature up to maximum. It takes a long time, but eventually you will see the blue wax start to drip out of the sprue hole and burn off. After it started doing that I left it for another hour and a half until there was no more smoke.
You can burn out the wax in your oven, I did it. Once. Unless you have an oven with a particularly good internal vent fan or an outside oven, you will have problems with smoke and the acrid burning smell of wax in your dwelling for at least a day
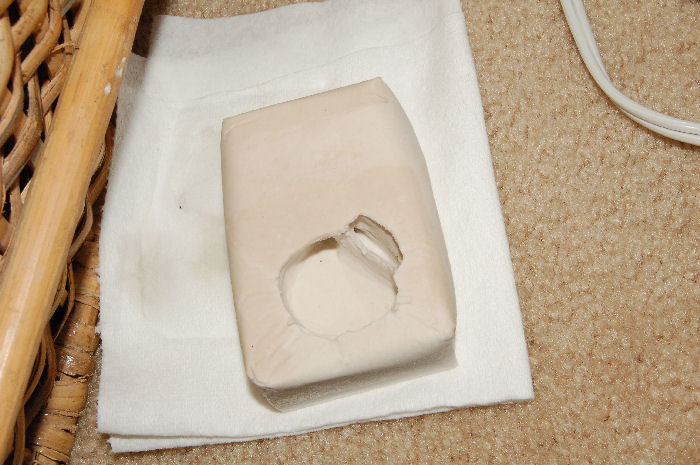
Once you burn out everything you will have something like this. The mold below has that strange two part crucible because it was an experimental mold design that didn't make any difference. (The big side accepts the metal, the small hole is the air exhaust)

Building The Centrifuge
When I first conceived this project I knew that I would have to build a centrifuge, but I didn't know exactly how I was going to do it. After sitting down and drawing out a few designs I had a design for one made from wood, it had a chain drive that was turned by a hand crank. Looking at the design I realized that it looked a whole lot like the rear end of a bicycle. Instead of going through the nightmare of building a chain drive from scratch I decided to repropose an old bicycle instead.
What I ended up doing is cutting off one of the pedals (the left one if you are sitting on the bike) so that the bike could lay on its side on the ground. Removing the brakes, the front fork and handlebars (though I left the rear shifter attached to the derailleur to change gears), the tire, and the seat. Basically I stripped it down to a frame with a single pedal, back wheel, rear derailleur and rear shifter.

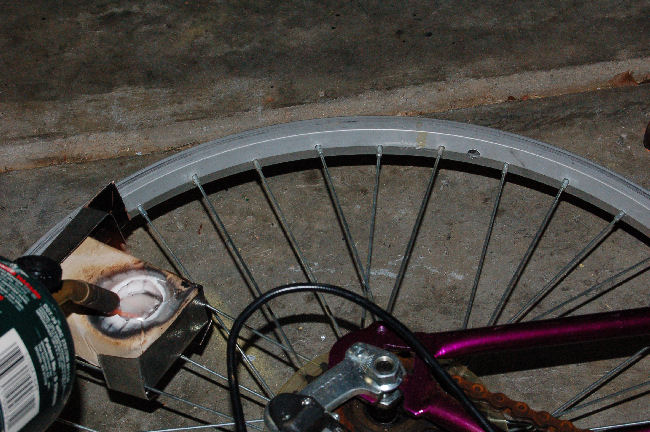
I built a mold holder from some sheet metal I had lying around. It doesn't really matter how its done so long as the mold is held securely between the spokes (although tape isn't recommended, the mold gets extremely hot and tape will melt/burn/fail. Make sure that when the mold is placed between the spokes and the wheel is turned that there is clearance and it doesn't collide with any part of the bike.

The final step to prepare the centrifuge is to add a counterweight. It depends on your mold, I used a plastic box full of bolts. I could add or remove bolts depending on how heavy my mold was. I held the counterweight on with masking tape.
Cast Something
All that work has been for this moment. Casting something! The process to cast something is pretty simple:
- Put on your fancy safety glasses
- Preheat mold gently, then mount mold in centrifuge (careful handling it - super hot!)
- Melt the metal down in furnace or in the crucible with a blowtorch if possible.
- Place metal into crucible side of mold, keep a torch on it until you are ready to spin the mold so that it doesn't solidify
- lean a board against your legs between the centrifuge and you to keep flying bits of metal from hitting your legs (trust me the metal does get flung). I also recommend wearing pants, long sleeves, and gloves.
- remove the torch and immediately crank the pedals quickly. I keep pedaling for at least 45 seconds to give the metal time to solidify
- Let the mold sit for an hour then break it open


That's pretty much it. Polishing the piece with a dremel really brings out the shine and gets rid of any small surface defects. I hope this article was informative and helpful!